I had been writing shell commands for every small infrastructure change. It worked, until I needed to repeat the same change on another machine and could no longer remember which command I had run first. That was my reason for starting with Ansible.
I did not start with a large role or a complicated deployment. I picked one host, made one change, and tried to make it repeatable.
The basic model#
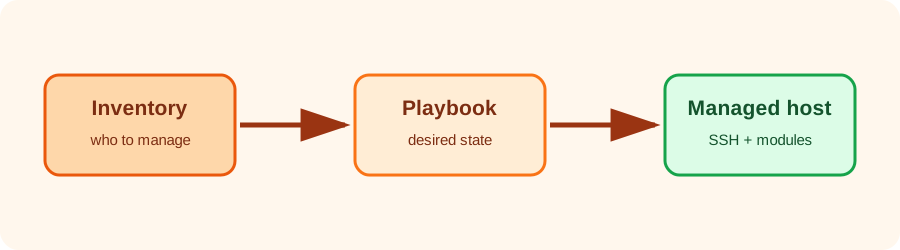
Ansible has three useful building blocks:
- Inventory: the machines Ansible can contact.
- Modules: small units of work such as
package,service,copy, andcommand. - Playbooks: YAML files that describe the desired state.
Ansible normally connects over SSH and does not require an agent on the managed machine. The control node needs Ansible, SSH access, and Python on the target for most built-in modules.
A first inventory#
I started with a tiny inventory.ini:
[web]
web01 ansible_host=192.0.2.10
The address uses the documentation-only 192.0.2.0/24 range. Replace it with a host you control.
Check connectivity before changing anything:
ansible -i inventory.ini web -m pingIllustrative output from the small test:
web01 | SUCCESS => {
    "changed": false,
    "ping": "pong"
}
The ping module does not test ICMP. It verifies that Ansible can connect and execute a small Python module.
An ad-hoc command#
Ad-hoc commands are useful for exploration:
ansible -i inventory.ini web -m command -a "uname -a"They are not a replacement for a playbook. Once a command matters, capture the intent in version-controlled YAML.
The first playbook#
Create site.yml:
---
- name: Prepare web servers
  hosts: web
  become: true
  tasks:
    - name: Install nginx
      ansible.builtin.package:
        name: nginx
        state: present

    - name: Ensure nginx is enabled and running
      ansible.builtin.service:
        name: nginx
        state: started
        enabled: true
Run it with:
ansible-playbook -i inventory.ini site.ymlThe important word here is state. state: present says what should be true, not which installation command should be run. The first run changed the machine; the second run should mostly tell me that there was nothing left to do. This property is called idempotence, and it was the part that made Ansible useful to me.
A practical progression#
For a small project, this sequence works well:
- Prove SSH access with
ansible ... -m ping. - Explore with a read-only ad-hoc command.
- Write a task using a purpose-built module.
- Run with
--checkwhere the module supports check mode. - Add the playbook to source control.
- Split repeated work into a role when the playbook grows.
Ansible becomes valuable when the playbook describes the desired result clearly enough that another person can review it. The goal is not to hide shell commands behind YAML; it is to make operational intent visible, repeatable, and safe to rerun.